Tuesday, October 30, 2012

Peanut! Peanut Butter!


The life of a teacher/runner's wife is full of protein of all kinds.  When Derek tutors, his days run about 9.5 hours.  Add running 5 miles at 4:45 am and 3 miles at 4:30 pm on top of that and I have one tired man on my hands. 
 
He is also a create of habit.  Cheese and sausage for breakfast.  PB&J, pineapple, and chips for lunch.  Grilling and veggies for dinner.  Every.  Day.  How then do I add in some extra healthy protein for him?  Peanut butter.....everywhere....all the time.  A spoonful at breakfast.  A spoonful for dipping his afternoon Kit-Kat in.  Or mixed with Nutella and whip cream for his own special mixture of happiness. 
 
We happened to have a container of peanuts left over from a recipe I never tried so what did we do with it? That's right! Made home made PeAnUt BuTtEr!!!
 
Here's what you will need:
  •  Peanuts (any kind! Honey roasted, dry roasted, salted, mixed nuts, etc)
  • Food processor
  • Oil (veggitable, peanut, olive, any kind will do)
  • A container to put the peanut butter in (I used a square Rubbermaid so you can use anything if you don't have a free mason jar)
  • A small spatula to scrape the edges of the processor


Here are my peanuts!
 
 
I did batches because my food processor is small.
Pour about 1/3 of the peanuts into the processor.
I only have Chop and Grind on mine so I chopped for about 1-2 minutes.
The peanuts become like powder. 
Then Grind for about 4 minutes.  Scrape the sides of the processor to help mix every now and then.

 
You might need to add a teaspoon or two to the peanuts throughout the process. 
Of course, this is completely up to you.  If your butter looks a little dry, add some oil. 

 
Voila! 

 
The more you mix the creamer your peanut butter will become.

 
Of course, Derek had to do a "taste test" throughout the process. 
He found that it was a little bland so we added salt while mixing.  I think that if the peanuts were salted that probably wouldn't have been a problem.
 
 
Peanut butter has become so expensive and it's SO much fun to make things with Derek. 
 
I can't wait for our next adventure! 

Monday, October 1, 2012

Hung by the chimney with care

Christmas is not my most favorite time of the year.  Christmas can be a very difficult time for my family. 
 
I was wrapped around my grandfather's little finger.  I am the only girl born into my dad's family for generations which made me special.  PawPaw adored me.  Hot June and July afternoons were always filled with laying in his lap as he scratched my back and sang Christmas carols to me.  Yep, Christmas carols in June and July! 
 
He loved, and I mean LOVED Christmas.  He was sick for a long time and one Christmas morning he had seen all the Christmases on this earth his frail body would let him.  It is only perfect that the last song he sang me was Bing Crosby's White Christmas that Christmas Eve just hours before he went to be with his Jesus.
 
Time heals hurts.  So does a little Bing Crosby.  And some fabric and a sewing machine. :-)  PawPaw would be GIDDY at seeing this...even if my stocking is lopsided with Alabama hounds tooth.  He would still love it.  This is for him.
 
 
This is what you will need: Fabric, ribbon, rotary knife, backing (optional), sewing machine.
Extras:
1. If you are making a cuff for your stocking, make sure to get a different color/pattern than the main stocking.
2. Each stocking will take about 1/3 of a yard.  I was able to use 1/4 of a yard per stocking because I played with the pattern to get it to fit before cutting it out.
3. Pick your fabric wisely.  Think about what you are using this for....to hang up and put objects in.  I used flannel and an upholstery fabric.
4. Pick your stitch wisely.  Same as above.  You will want your stockings to last and not pucker.  Pick a more complicated stitch that will give you forward, backward, and side stitches. 

 
Okay, let's do this....
Here is the pattern I used Stocking Pattern. Print it out, cut it out, tape it together. 
 
 
This is what the patter looks like put together. 
Leave your fabric folded in half.  You will only trace and cut once with the fabric already on top of each other.
 
 
Pin the outside together before sewing.
**Make sure you are using a size 14 needle and a quilting foot on your machine.  These are thick fabrics that need heavier needles.**

 
Time for the cuff.  With your rotary, cut your cuff 15x9 inches. 
Fold your fabric in half.  It should now be 15x4.5 inches.  Sew the narrow edges together.

 
When picking your ribbon, try to get a wider ribbon.  1inch will do just fine.  Cut strips of ribbon 6-7 inches long and fold in half to create a loop. 
Keep your stockings inside out while you attach the cuff and ribbon. 
Slide the cuff onto the stop of the stocking.  You want all rough edges from the stocking and cuff to be together. 
Slide the ribbon between the top of your cuff and stocking.  You should have one layer of stocking, edges of the ribbon, then 2 layers of cuff (because you folded it, remember).
Pin the ribbon in place.
Sew cuff and ribbon to stocking. 

 
Pull the stocking ride side out.  Fold the cuff over.
Viola! Hang them by the chimney with care for St. Nick to fill with coal. :-)
 
If your stocking does not hang as "stiff" as you would like it, here is a tip --- add backing.  When first cutting out the stocking, add a layer of backing to your stocking before sewing.  You would then have a fabric sandwich. 
 
In the picture, the red hounds tooth are mine and Derek's while the red plaid are Mom's.  I'm pretty excited to be hanging them up this year!!


Tuesday, September 25, 2012

Homemade Goodness

Wow, it has been WAY  too long since my last blog! Sorry for that but you all know that when life gets busy, Life. Gets. Busy!

Anywho...I know not everyone enjoys sewing and crafting as much as I do so here is an amazing recipe for you who likes a little adventure in the kitchen.

You must be forewarned that this recipe takes a L O N G time to finish, but it is more than worth it in the end.

I love football as much as Derek does, but if I'm not interested in the teams playing I am really not interested in the game.  Thankfully Derek shares my sentiments.  I know there are MANY of you gals and some of you gents out there that are not interested in the slightest.  What is there to do then for the FOUR hours your significant other is enthralled with something on television?  BAKE!

A mom living in Alaska blogged a recipe for Caramel Apple Pull-Apart Bread.  I fell in LOVE.  Derek fell in love.  Our waists got a little wider too.  For those of you watching your figure and looking for healthy foods, this is most definitely not for you. 

The recipe calls for Active Dry Yeast.  If you are anything like me, you are going to search the web for any kind of substitute for this just to keep from going to Wal-Mart to buy some.  Go on.  Cave.  You will not find anything.  Go to the baking aisle of your nearest grocery store and get the jar of Active Dry Yeast.  Trust me, it will be the best $5 you have ever spent.  You will only use 3Teaspoons of the yeast for the entire recipe and have a ton left over.  If you aren't a big bread lover, there are small packets for $1 so you can throw the rest away and not feel bad about it.

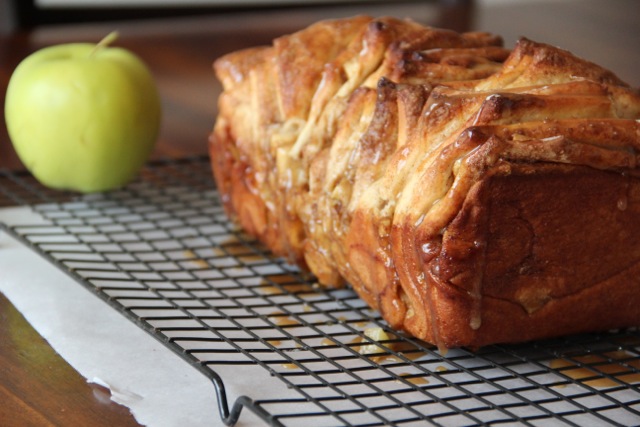
I am not a fan of cleaning cooling racks so, instead of taking the loaf out of the pan and putting it on the rack, I left the loaf in the pan, put it on the rack, then poured the caramel glaze on top for it to drip down into the pan.

DELISH! Enjoy both the taste and the smell!
Caramel Apple Pull-Apart Bread
Yield: 1 loaf
IMG 9827 Caramel Apple Pull Apart Bread
Bread recipe adapted from The Craving Chronicles; Glaze recipe from Food.com
Ingredients
    For the Dough:
  • 2-3/4c all-purpose flour (plus 1/4 cup or more, if needed)
  • 1/4c sugar
  • 2-1/4t active dry yeast
  • 1/2t salt
  • 4T butter, melted
  • 1/3c milk
  • 1/4c warm water
  • 1t vanilla extract
  • 2 eggs
    For the filling:
  • 3/4c brown sugar
  • 2t cinnamon
  • pinch of salt
  • 3T butter, melted
  • 1 large tart apple, peeled, cored, and diced (Golden Delicious or Granny Smith recommended)
    For the Caramel Glaze:
  • 2T butter
  • 1/2c brown sugar
  • 2T milk
Instructions
  1. To the bowl of a stand-mixer fitted with the dough hook attachment, combine warm water and yeast.
  2. In a microwave-safe dish, heat milk and butter together until butter is just melted, but not too hot. Add vanilla.
  3. Add flour, sugar, and salt on top of water/yeast mixture in mixing bowl. Turn mixer on low, add eggs, and stream in milk/butter/egg mixture gradually until a soft dough forms. Add flour by the tablespoon until the dough pulls away from the sides of the bowl and forms a ball. Turn mixer up to medium speed and knead 3 minutes. Cover and let rise in a warm place 90 minutes.
  4. Meanwhile, in a small bowl mix together the brown sugar, cinnamon, and salt for the filling. Set aside. Prepare your apples and melt butter just before the dough is done rising. Grease a standard 9x5 loaf pan.
  5. Turn risen dough out onto a floured work surface and roll out into a large rectangle (roughly 12x24 inches, but it doesn't need to be perfect). Dough will be rather thin.
  6. Brush dough with melted butter. Sprinkle the entire surface with the cinnamon sugar mixture.
  7. Using a pizza wheel, cut dough into equal-sized, long strips. Sprinkle the first strip with 1/6th of the diced apples. Lay the next strip on top of the first strip. Sprinkle with apples and cover with another strip. Repeat until all the strips are stacked on top of each other.
  8. Cut the stacked strips into 4-6 equal stacks of squares (about 4-5 inches in size). Stack the squares vertically into prepared loaf pan. Cover with a kitchen towel and let rise 30-45 minutes.
  9. Preheat oven to 350. Bake the bread on the middle rack of oven 40-45 minutes or until golden brown and cooked through (check center for doughiness). If the bread gets too brown on top before it is done cooking in the center, cover loosely with foil for the remainder of cooking time.
  10. Cool on a wire rack for 10 minutes. Meanwhile, prepare the glaze by adding the butter, brown sugar and milk to a saucepan over medium heat. Bring to a boil and cook for 1 minute.
  11. Turn loaf out onto a rack with parchment paper underneath it. Drizzle the loaf with the warm caramel glaze.
  12. Best enjoyed the same day it is baked

Saturday, September 15, 2012

Bulkin' Up!

 
Warning: this is going to be a LONG blog. 
There, you have been warned.  Read ahead at your own discretion.
 
Yes, it is just Derek and myself living in our home.  No, we do not have any children.  Yes, we shop at Sam's!  Yes, every single time I walk in to buy groceries I feel like I am grocery shopping for the entire country of Nepal.
 
 
While we were dating and engaged, obviously we spent a WHOLE lot of money on groceries.  We were stocking my apartment and his house thus needing double of everything.  Then when we got married, we kept our same buying habits. Buying a lot....all the time...spending a lot of money and time.  Something had to change.
 
We started with buying more than one week at a time.  Instead of going to Target every week and getting just what we needed for that week, we started shopping for as close to 2 weeks as we could.  Outside of shopping for longer periods of time, we had to set a budget.  We are a family of two with one full time income (a teacher's income at that! If we lived in Chicago this wouldn't be an issue, but we don't).  After attaching a monthly budget and spacing out our buying habits we came to the realization that buying in bulk is our best option.
 
First let's talk about budget.  When Derek and I were shopping every week we were spending $100 every time we walked through the doors.  That is $400 per month!  For two people, that is just absolutely unacceptable and extravagant.  We had to do something.  The first month or two our budget went from $400+ per month to about $300-400.  We were buying the same things we always eat but just the larger container which is cheaper per unit. 
If you are having a problem with finding the best deal, look at the price sticker that is on the shelf.  In REALLY small letters you will see "Price per unit". 
 For this item, the price per unit is $1.19 but you are buying the item for $1.79.  Let's say that the item is 24oz and next to it is an item that is 30oz for sale for $2.00 and the price per unit is $1.22.  You are paying $0.04 more per unit but are getting 6oz more.  The better deal here is the $2.00 item.
 
Secondly, make a list.  Derek and I have a magnetic clip on our refrigerator that we keep a piece of scrap paper and a pen attached to.  When we start to run low on anything we write that on the paper.  That list is what we then take shopping with us.  We may buy shampoo this month but not again until December.  Shampoo may go on sale next week but we don't need it and it will go on sale again.  Stick to the list. 
 
Thirdly, only go to one store.  Gas is at an insane high right now.  You don't want to start and stop your car four times going to four different stores just to get the best deal on toothpaste.  By the time you have used your gas to get to that cheap toothpaste, you have paid the same amount as if you had just bought it with a coupon at the first store.  Maybe this week WinnDixie has meat and produce at the best rate...go there for all of your groceries.  Next week, it could be Target.  
 
Yesterday I went to Sam's Club and bought 3-4 weeks worth of groceries and spent $189.  Here is the breakdown:
 toilet paper: 42 rolls (I think, maybe 32) anyway, enough for a whiiiiile
dawn: 3, 30oz bottles
chips: 30 individual bags
cookies: 30 individual bags
protein bars: 18 individual bars
vegetables: 4 bags of frozen broc/cheese and 8 cans of corn
meat: 1 6lb bag of chicken and 1 9piece container of pork chops
eggs: 18 size large
pineapple: 6 cans (each can is separated into 5 small Rubbermaid's=1 can/week)
juice: 2 large bottles come together
face wash: 1 set (2 24oz bottles come together)
bread: 2 loaves are in 1 bag together
milk: 2 gallons
bananas: 1 bunch
Ziploc: 1 box = 4 small boxes = 254 total bags
toilet cleaner: 1 box = 4 containers of cleaner
brown sugar: 1 7lb bag
jimmy dean sausage: 1 box = 24 sausage patties
apples: about 6lbs

When I get home, I separate all of the meat into the Ziploc bags. The chicken breasts are SO big that one is the correct portion size for both of us. Same with the pork chops.


Our biggest success is the pineapple.  Derek carries pineapple in his lunch everyday.  We use to buy at Target a 4 pack of pre-packaged pineapple for $2.00.  That means 1 day a week he does not get any pineapple or we have to buy 3 packs for 2 weeks.  Now we spend $7 for 6 cans.  Each can is equally separated into 5 Rubbermaid containers.  That is $7 for 6 WEEKS as opposed to $6 for 2 weeks!
 
Good luck! Have fun!! I hope my adventures can help you save money and time. 

Wednesday, September 12, 2012

Splish Splash, I love taking baths!


I love love LOVE baths and suds and bubbles.  Derek just does not understand.  I think it is a girl thing.  Never have I ever met a girl who didn't love loofahs and bubbles and soap that smells good.

Now that we have covered the things I love, now lets talk about the things I hate.
1. Loofahs that have expanded to the size of Texas
2. Nasty bars of soap that sit on the side of your tub and leave gross soap rings
3. Never getting the right soap to washrag ratio

Thanks to www.pinterest.com I have found the perfect solution!  Soap Rags!!  You put the soap in, it lathers while you use it, then when the soap is gone just throw the rag into the wash and BOOM a whole new one!

Here is what you need: Some form of towel (I used an old hand towel but you could use any size), bar of soap, scissors, measuring tape, and your sewing machine.

 
If you are using a hand towel, place the soap on the towel and cut a straight line all the way down.  If you use a bath towel, make your strips about 3"x6".  **Depending on how big your soap bar is, your width could change.**

 
Roll the non cute edge 1/2" then another 1/2".  Secure with pins.  Sew together.

 
Fold the two ends together until the entire rag is 4.5" long.  Sew the long edges together leaving the narrow ones open.

 
You now have a pouch with the seams visible.  Turn the pouch inside out.  Place the soap inside and go take a bath!
 
 
This is a great idea for students going away for college!! Just stack a few on top of each other and attach with a cute ribbon.  No need for wrapping. :-)
 
 
Enjoy!  Let me know what you want to try but haven't had the time or courage. 

Saturday, September 8, 2012

After "I Do"

I know all of you married folks out there asked the same thing Derek and I did after we got home from our honeymoon.

"What do we do with all this stuff?!?!"

Our wedding was small, intimate, and very homemade.  Pretty perfect for us!  Since we did most of the decorating ourselves we had all of this STUFF left over and no clue what to do with it.

Here's a view of our aisle decorations....

 
We went to Hobby Lobby and found these awesome shepherd's hooks for about $8 a piece.  We only had four rows so we bought 8 hooks.  A friend of ours had 8 old mason jars she let us borrow.  If you need mason jars, you can easily get more than you can imagine at Wal-Mart, Target, Hobby Lobby, Michaels, or Old Time Pottery.  I've seen them everywhere for extremely cheap!
 
I bought one yard of plain burlap and cut 8 strips about 3 inches wide then just tied those strips around the jars.  Finally, Hobby Lobby has a fantastic dried flower section and always great bargains!  Derek and I are different and like different things so we bought three different kinds of flowers with differing heights that we placed in descending order. 
 
The wedding was perfect, reception was perfect, honeymoon in NYC was perfect.  Then we got home to a mess.....the wedding was at my parents' house so their garage was LOADED down with shepherd's hooks, mason jars, dried flowers, vases, etc etc etc!
 
Facebook is amazing for networking.  The city we live in has a page called "Give-Sell-Swap" where you can post things and, well, give, sell, or swap.  Seeing as I was never going to use 20 small vases again, I put them on facebook and sold them for a decent price!  The flowers were a different story...
 
I wanted to keep the flowers.  They were just too pretty to throw away and they smell amazing!  So, I made a wreath! 
 
First of all, I took an old Styrofoam wreath and cut it in half.  I now have two wreath "bodies" and it fits better in my door hanger!
Secondly, I wrapped the wreath with twine.  I have used twine before as a base and attempted to secure it with fabric glue.  That didn't work out too well.  This time, I cut multiple strips of the twine about 3 feet long a piece.  I wrapped the twine around the wreath then put hot glue throughout that section.  The glue not only held the twine to the wreath but it also connected each ring to itself.  
Thirdly, cut off the flowers till you have about a 3 inch stem or shorter. 
Finally, place your outside flowers onto the wreath.  Hot glue that stem bunch to the middle of the wreath.  Your stems will be in the middle and your flowers will spray out to cover the whole thing.  Continue to work your way to the middle of the wreath.  After you've done one half, do the same flower placement to the other side.
 
I didn't secure my flowers this way and I wish now I would have.  They would have looked neater and more organized if I would have. 


VIOLA!! I'm pretty proud of this little adventure!
 
 
Please feel free to leave me comments!  Have you been thinking about trying something out but need somebody else to try it first? I love a challenge! Send one my way! 


Monday, September 3, 2012

Cleanliness is next to Godliness

I must say, laundry is the BANE of my existence!! I mean, really, can I get an AMEN?!

Not only does it have to be done all of the time, clothing itself costs a ridiculous amount of money, power to use the washing machine, and THEN buying laundry detergent! Where does it end???

Okay, that's enough of my rant....here are two things Derek and I did to try to resolve some of the expense for this nonsense.

This past June our power bill was MUCH higher than we both had anticipated and we HAD to do something about that.  First, Derek built a clothesline.  (We aren't exactly certain that we were supposed to do that in our neighborhood but, oh well!)  Yes, DEREK built a clothesline!! All. By. Himself.  This, ladies and gents, is an event of epic proportions.  Take a look...
Four 6 ft 4x4s, two 4ft 1x2s, shovel, concrete, screws, drill, and some wire. 

He screwed the 1x2s to the 4x4s to make an arch.  Then, he dug four holes about 2 ft deep.  The posts then went into the holes while we mixed the concrete with water in a bucket....with our hands :-) You will need 2 bags of concrete because our one was not enough to completely fill the holes.  You can attach the wire to the cross boards a couple of ways: buy a C-clamp/anchor OR a clothesline clip at Lowe's and it will have everything you need for the line part.  Let the concrete dry and VOILA!

One of our five closets consists ONLY of hangers so we decided to not use clothespins but hangers instead.  Once the clothes are dry, not only do they not have nearly as many wrinkles but they are already on the hanger and ready to put up!

How much did we save on our power bill, you may ask?!  WEELLLLL....July it was a whopping $2!! Hey, we were excited for that! I mean, we live in MOBILE where it is scorching hot and we still saved money! I would call that a winner!

Okay, so we don't really use our dryer anymore and 1 week's worth of ironing for 2 people has been cut from about 2 hours to right at 45 minutes! Now on to the actual WaShInG of the clothes.

What do you need to wash with?  Detergent!  Thanks to www.tipnut.com we found a CHEAP and EASY recipe for homemade detergent.

Ingredients: 1 bar of Fels-Naptha (Grated! Finely!! It makes about 2 cups), 2 cups Borax, 2 cups Arm & Hammer Washing Soda. ***If you want it to have a special scent, you can always add in a few drops of essential oils or fabric softener.***

Put a BIG pot on the stove and bring 2 quarts of water to a BOIL.  Slowly mix in the grated soap.  It takes a while so be sure to have Pandora on a station you enjoy! :-)

You might have to slowly add some water to help the soap melt.  This is what it should look like mid melt.

After the grated soap is melted, pour in 2 gallons of water, the washing soda, and Borax.  Mix ALL that together -- it will be foamy - really foamy!

Make sure you have some containers to put the detergent in when you are finished!! It made about 3 gallons.  As you can see we had to use make-shift things to hold ours, but it worked. :-)
I used a 1 cup measuring cup to scoop from the pot and pour into a funnel.  I'm pretty messy/accident prone so that was a VERY good idea! 
 
 
We made this the beginning of July and have only gone through one half gallon! Our clothes smell awesome and it only cost about $10!! Bargain? I think so!
 
My last bit of insight is this: shake it up when you use it because if you don't melt the soap all the way or you have large chunks they will all sink to the bottom, and if you have a front loader make the slot where you detergent go the height for when using powder.
 
That's it! Enjoy and happy washing! 

Friday, August 31, 2012

Background Checks

Every new adventure somehow includes a background check.  Here's mine!

Where do I begin??? I am a girl in my 20's. I'm a newlywed and am so in love with my husband (Derek).  For the majority of my life I was a preacher's kid....yes, we are the worst!  :-) I grew up in small towns in Alabama and currently live on the Gulf Coast.  There's something about Alabama football, a campfire, and a glass of ice cold sweet tea that brings a smile to my face.  Derek and I are both graduates from the University of Mobile.  I've done everything from delivering the morning newspaper to working for a multi-million dollar computer software company.  I am the happiest in my kitchen, behind my sewing machine, in the middle of a good book, and laying on the beach basking in God's glory.

I thrive when interacting with others.  Derek is most definitely the complete opposite.  I will be in the middle of our group of friends laughing and pouring someone a drink while he sits back and observes everything going on in his surroundings.  It is amazing how beautifully we work together.

Eight years ago I was ready to get out of my parent's house!! I was the typical teenager bursting to spread my wings, make a name for myself and not caring what was out in this big vast world to stop me.  And boy did I ever spread those wings of mine....Derek and I met our freshman year at UM.  He was a diligent student who was focused on a new hobby (which has turned obsession), RUNNING.  He has lost and kept off about 80lbs thanks to that diligence.  He also had the highest GPA from our graduating class.  Smart, cute, and funny? I'd say he's a keeper!  I, however, was not so diligent in my studies or my health.  I thought Derek was a snob and I did NOT have time for such a party pooper.  Derek thought I had no goal in life and was a disorganized school slob.  Though partly true, he soon realized I'm slightly more than a pretty face :-)

For seven years he was "Just Derek" and I was "Just Rebekah" to our colleagues, friends, and family.  After much determination, I insisted we hang out.  I had much more on my mind than simply hanging out with my old friend.  Sitting at a corner table at Starbucks I looked at him and said "What is going on with us?  I can't just be your friend anymore".  My life hasn't been the same since!  Two months later he proposed as the sun was setting at the pier in Fairhope, AL.  It was beautiful and perfect.  April 6 we had our dream wedding at my parent's lake.  My Dad married us and our families came together for a perfect afternoon of BBQ, cupcakes, and the beginning of us! 


If getting married wasn't an adventure enough for me, I quit my job three weeks into our marriage.  My job provided a good income and security that could turn into a very lucrative career.  Why did I leave?  Good question...God has other plans for us.  I am called to be a wife who supports and follows her husband and one day a mom who nourishes and teaches her children.  I could not successfully do that and still hold that position.  Many women have, don't get me wrong, I just won't be one of them. 

Here I am now.  I work part time for a local monogramming shop, substitute for a Montessori school, and most importantly, work with a pro-life ministry called PULSE and I love it! I love it all!  There's more...it's time to start a blog. 

My plan and hope and dream is to blog about new books I'm reading, the latest craft project I've done, DIYs Derek and I have tackled, and of course new recipes (good AND bad!). 

Welcome aboard! I hope you took your Dramamine, things could get a bit rocky!

ROLL TIDE!